We all know the agonizing frustration of snapping a favorite, often expensive, cosmetic product mid-application. Watching your perfectly pigmented color wand crumble onto the vanity feels like watching money go down the drain. The experience leaves you wondering if you should toss it or try a risky home fix.
A lip crayon differs structurally from traditional lipsticks housed in sturdy metal bullets. Their narrower diameter and softer, balm-like formulas make them highly susceptible to breaking under pressure. The combination of high emollients and a thin barrel creates a perfect storm for structural failure. They also prove trickier to repair safely because indirect heat must carefully navigate around the surrounding plastic casing.
This guide provides a transparent evaluation of whether your broken product remains truly salvageable. You will learn step-by-step repair protocols alongside essential hygiene considerations to maintain formula safety. Ultimately, we will help you confidently decide between attempting a careful DIY fix and simply repurchasing.
Key Takeaways
Assess viability first: Not every broken lip crayon is worth saving; drops on unsterile surfaces or shattered bases usually warrant a replacement.
Mind the casing: Unlike traditional lipsticks in metal bullets, lip crayons are often housed in plastic, requiring indirect heat (hairdryer) rather than an open flame (lighter) to avoid toxic melting.
The freeze protocol is mandatory: Re-fusing the wax matrix of a lip crayon requires 12–24 hours of cold-curing to restore structural integrity.
Depotting as a fallback: Unsalvageable sticks can be successfully repurposed into potted lip balms without sacrificing product performance.
1. Evaluation Stage: Should You Repair or Replace Your Lip Crayon?
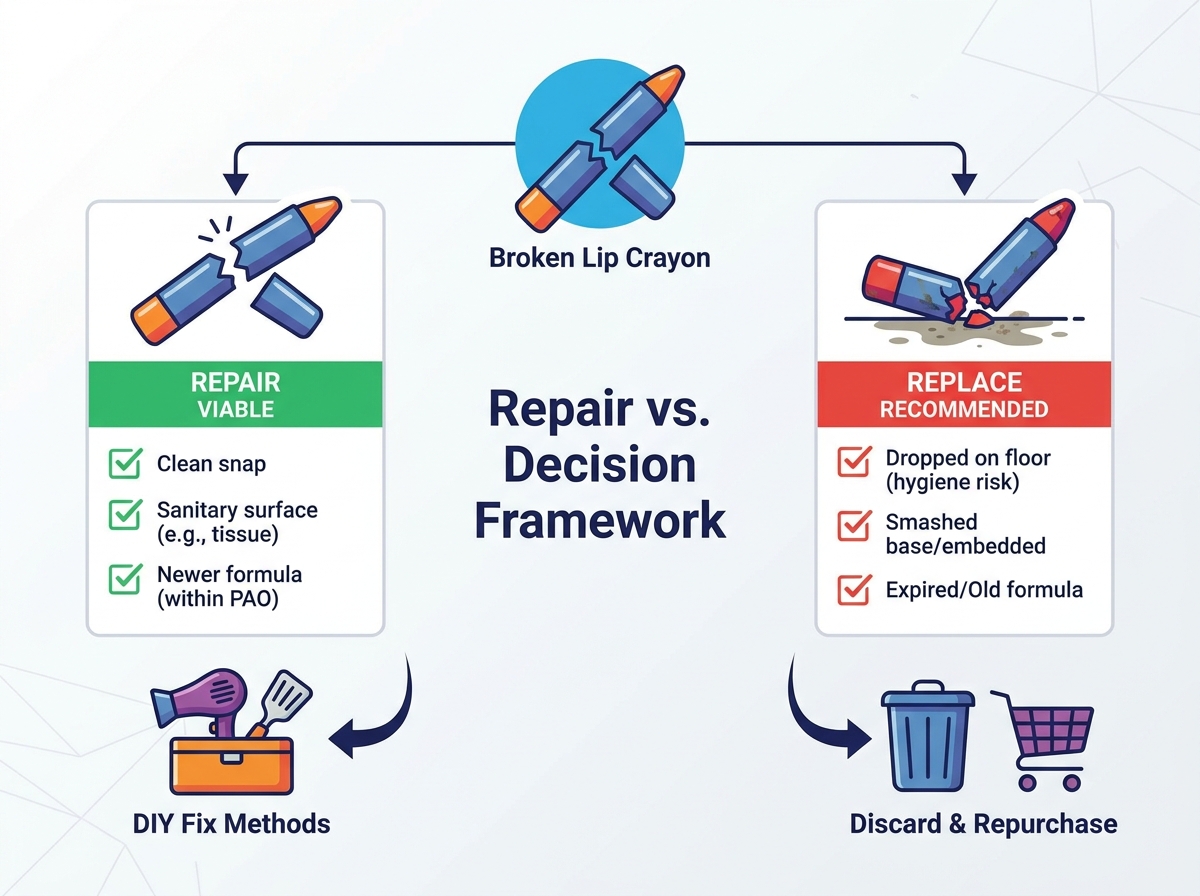
You must balance cost, hygiene, and effort before attempting any cosmetic repair. Fixing makeup saves money, but holding onto contaminated products poses real dermatological risks. You need a clear decision framework to evaluate the damage objectively.
When to Repair
Certain break patterns present excellent opportunities for a successful, hygienic fix. You should proceed with a repair if the damage meets these specific conditions.
The break is a clean snap near the middle or top of the stick.
The crayon broke directly into a clean cap or onto a fresh tissue, ensuring no cross-contamination occurred.
The formula remains relatively new and sits comfortably within its Period After Opening (PAO) window.
When to Replace (The Risks)
Sometimes, discarding the product protects your skin better than saving a few dollars. You should throw the item away if you encounter the following scenarios.
The crayon dropped on a floor or unsterilized surface, creating an immediate bacterial risk.
The formula approaches its expiration date, as adding heat will rapidly accelerate rancidity in older oils.
The break rests deeply embedded inside the twist-up mechanism. Extracting it becomes impossible without completely destroying the applicator.
Success Criteria
A successful repair should restore 80 to 90 percent of the original structural integrity. You should notice no alterations in the product's color payoff or texture. If the resulting stick feels gritty or crumbles upon light pressure, the repair did not succeed.
Repair vs. Replace Decision Matrix
Damage Type
Contamination Level
Age of Product
Recommended Action
Clean middle snap
Zero (broke into cap)
Under 6 months
Repair (Method 1)
Smashed near base
Zero (stayed in tube)
Under 12 months
Depot (Method 2)
Clean top snap
High (dropped on floor)
Any age
Replace immediately
Stuck in mechanism
Low
Over 18 months
Replace immediately
2. What You’ll Need: The Lip Crayon Repair Toolkit
Preparation dictates the success of your cosmetic repair. Gathering the correct tools ensures you execute the steps swiftly before the wax cools. Furthermore, prioritizing sanitation prevents you from inadvertently introducing acne-causing bacteria into your favorite color product.
Essential Tools
Heating Element: A standard hairdryer on a medium setting works best. We prefer this over a lighter to prevent melting the plastic barrel or scorching the delicate wax.
Sanitation: 70% Isopropyl alcohol provides the optimal evaporation rate to sterilize your tools without leaving a harsh chemical residue behind.
Handling Tools: Keep a clean dabber, a small metal cosmetics spatula, or a thoroughly sanitized butter knife nearby to manipulate the wax.
Curing Environment: Clear a small space in your freezer. Cold temperatures remain absolutely essential for resetting the emollient formula permanently.
Surface Protection: Lay down thick paper towels or use a disposable workspace. Melted wax stains porous surfaces almost instantly.
3. Method 1: The Heat-and-Seal Technique (Best for Clean Snaps)
Most structural failures result in a clean break across the shaft. The heat-and-seal technique tackles this exact scenario. Executing this correctly fuses the wax matrices back together, creating a nearly invisible seam. Follow these exact steps to ensure maximum stability.
Step 1: Prep and Sanitize
Roll the crayon mechanism down carefully to expose the base of the break. Do not force it if it catches. Spray 70% Isopropyl alcohol onto your metal spatula and let it air dry completely. Clean tools guarantee a hygienic working process.
Step 2: Soften the Base
Turn your hairdryer to a medium heat setting. Direct the airflow away from the plastic barrel to avoid warping the packaging. Gently warm the base of the broken piece and the stump left inside the tube. Wait until both surfaces appear glossy and slightly soft. This usually takes approximately 5 to 10 seconds.
Step 3: The Reattachment
Carefully align the broken tip with the base stump. Precision matters here to avoid a crooked stick. Press down with gentle, even pressure. You want to fuse the pieces securely without squashing the overall diameter of the stick.
Step 4: Sealing the Seam
Pick up your sanitized metal spatula. Gently smooth the seam where the two pieces currently meet. You must drag a tiny amount of melted wax over the crack. This step ensures no air pockets remain trapped inside the shaft.
Step 5: The Cold Cure
Retract the crayon fully into the tube to protect it. Secure the cap tightly. Place the tube upright in your freezer. Leave it there for a minimum of 12 hours. This extended cold cure forces the wax to harden completely.
4. Method 2: The Depotting Strategy (Best for Smashed or Base-Level Breaks)
Sometimes, a clean reattachment proves impossible. If your product shattered into multiple chunks or broke deep within the twist-up casing, you need an alternative. Depotting offers a brilliant way to salvage the formula without relying on its original structural integrity.
The Reality Check
You must acknowledge that softer cosmetic formulas simply cannot survive a second break. Matte or velvet variants often lack the robust structural binders found in traditional waxy lipsticks. Once their internal structure shatters, attempting to rebuild a standalone stick usually ends in frustration.
Execution Steps
First, scoop out the remaining product from the original tube using your sterilized spatula. Make sure to dig out any pigment trapped near the base. Next, transfer these remnants into a clean, sanitized travel jar or an empty lip balm tin.
Once you transfer the pieces, take your hairdryer and set it to low heat. Hover the airflow over the open jar. Gently melt the product flat until it pools evenly across the bottom. Tap the jar lightly on the table to release any trapped air bubbles.
The Final Outcome
This process converts an unusable broken stick into a high-functioning tinted lip balm. You can apply it easily with a synthetic lip brush or a clean finger. Depotting guarantees zero product waste and extends the life of your favorite shade indefinitely.
5. Hygiene, Texture Risks, and Implementation Realities
Repairing cosmetics involves chemistry. Altering the physical state of cosmetic waxes carries inherent risks regarding formula degradation. You must understand these realities to prevent ruining the product or harming your skin.
Temperature Abuse
Cosmetic chemists formulate makeup under strict temperature controls. Overheating cosmetic waxes can easily cause the pigment to separate from the nourishing oils. If you boil or scorch the formula, you often end up with a gritty texture. This separation results in an uneven color payoff that ruins the application experience.
Plastic Casing Hazard
Social media frequently popularizes dangerous beauty hacks. We must strongly reiterate the danger of using open flames on your makeup. Many online videos show users applying lighter flames directly to the packaging. Melting plastic introduces toxic fumes and invisible microplastics right into your lip product. Always rely on a hairdryer to supply safe, indirect heat.
Bacterial Traps
During the reattachment phase, air pockets pose a significant hidden threat. If you leave gaps in a poorly fused seam, they can trap ambient moisture. These damp, dark pockets harbor bacteria rapidly. Bacterial growth not only shortens the shelf life of the cosmetic but also puts you at risk for irritation or infection.
Prevention always beats repair. Adjusting your daily habits can drastically extend the lifespan of your makeup collection. To keep your lip crayon in peak condition, you need to minimize the physical stress it endures.
Usage Limits
Never twist the stick up more than a quarter-inch during application. Exposing too much of the shaft increases the leverage stress on the base. A shorter exposed tip easily handles the friction of application without snapping.
Storage Climate
Temperature fluctuations destroy cosmetic binders. Keep your makeup out of direct sunlight, hot cars, or tight clothing pockets. Your natural body heat softens the structural waxes over a few hours. If you try to apply a warm, softened stick, it will almost certainly collapse under pressure.
Application Pressure
Adjust your hand heaviness. Opt for multiple light-handed swipes rather than pressing firmly into your skin. These formulas are specifically designed to melt slightly upon contact with your body heat. Let the chemistry do the work instead of forcing the pigment onto your skin with heavy friction.
Conclusion
Fixing your snapped makeup feels incredibly rewarding when executed properly. We have established that repairing a clean break is entirely feasible if you work cleanly and prioritize a long freezer cure. Depotting serves as an excellent backup plan for thoroughly smashed formulas.
Here are your actionable next steps:
Evaluate the current state of your broken product right now.
Discard it immediately if you spot dirt, debris, or notice an expired smell.
Gather your hairdryer, spatula, and alcohol if the break looks clean.
Execute the heat-and-seal method carefully, taking your time with the seam.
Commit to the full 12-hour freezer cure before attempting to swatch the repaired tip.
FAQ
Q: Can I use a lighter to melt my lip crayon back together?
A: It is highly discouraged for lip crayons due to their plastic housing. A hairdryer offers controlled, indirect heat that won't melt the packaging or scorch the formula.
Q: Will repairing my lip crayon change its matte/glossy finish?
A: If heated gently, no. However, boiling or overheating the product can burn off volatile silicones or alter the wax structure, potentially changing the finish.
Q: How long does it take for a repaired lip crayon to set?
A: While it may feel solid after 20 minutes in the fridge, a full 12 to 24-hour freezer cure is recommended to properly harden the internal wax matrix.
Q: Is it safe to use a lip crayon that fell on the floor?
A: No. Lip crayons have an emollient, sticky surface that instantly picks up microscopic debris and bacteria. Attempting to sanitize a dropped porous product is ineffective and risks lip infections.
Guangzhou Vast Cosmetic Co.,Ltd. was established in 2018, a high-tech enterprise focusing on customizing make-up for customers, integrating scientific research, production, sales and service.